‘Time On Page’ is a Google Analytics metric that records the average amount of time users spend viewing a particular page.
Google has never stated that ‘time on page’ is a ranking factor. However many SEOs believe that the amount of time a visitor spends on your page tells the algorithm how relevant your page was to the search query.
In this article, you’ll discover seven do-able ways of getting your visitors to spend more time reading your blog posts and articles.
What Is Time On Page?
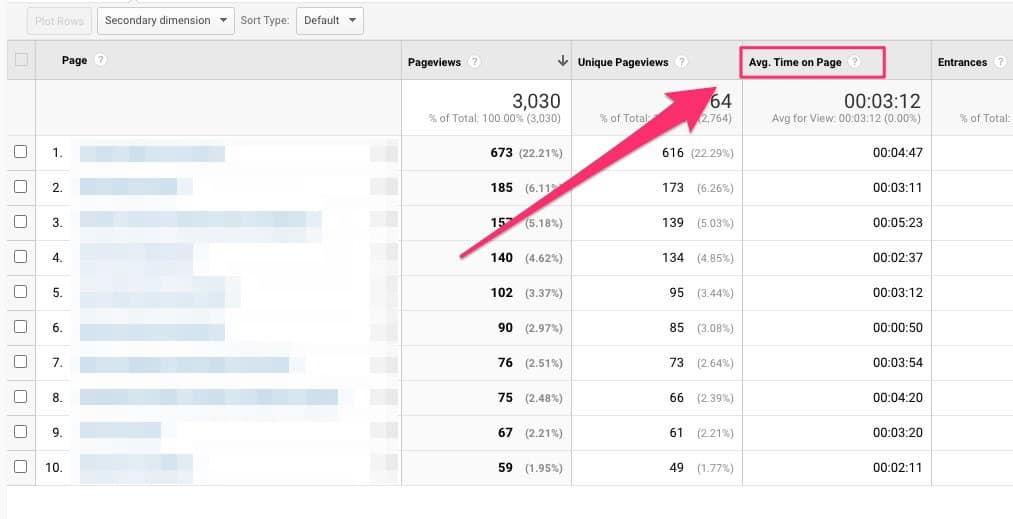
‘Average time on page’ is a metric that you can find in your Google Analytics account.
Just go to Behavior > Site Content > All Pages, and you’ll see this metric in the third data column:
Why ‘Time On Page’ Is So Important
Google has never said that ‘Time On Page’ or ‘Dwell Time’ is a ranking factor.
But most experts believe that the amount of time someone spends on a page sends a signal to the algorithm, and that signal is used to measure the relevance of the page to the query.
To put it another way: it seems more than likely that the longer a person stays on your page, the higher your page will rank in the search results.
But how do you increase time on page? How do you get people to spend more time reading your blog posts?
Here are seven ways of increasing the time your visitors spend on your page.
Seven Ways To Increase Time On Page
#1. Write a compelling introduction
It’s a startling fact but it’s true: 8 out of 10 people will read the headline but only two out of ten will read any further.
That statistic from Copyblogger just goes to show how difficult is it to keep your readers engaged.
The Internet is awash with content competing for people’s attention. And that means you’ve got to grab your reader’s attention right from the beginning.
And that’s why you need an Introduction that pulls your reader in right at the start.
When I started out blogging I realized my Introductions were not working.
So I sat down and analysed the Introductions of the top bloggers in my space: people like Brian Dean, Jon Morrow, Derek Halpern, Darren Rowse, and Sonia Simone.
What I discovered was a simple formula that nearly all successful bloggers use to pull their readers in right from the start.
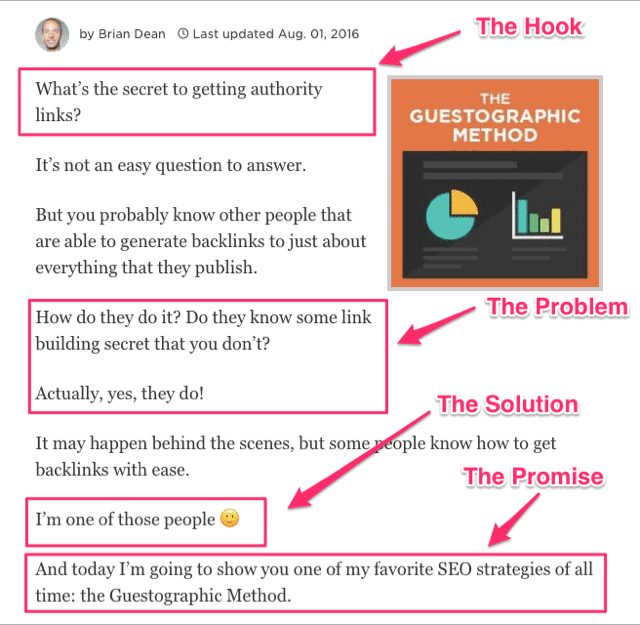
The formula has 4 key elements:
- The Hook
- The Problem
- The Solution
- The Promise

The hook is often a question.
As soon as you ask a question it creates an automatic reflex in your reader: they try to answer it.
Bam! Your reader is involved – she’s already engaged with your blog post.
The next part is the problem – it’s vital because that’s why your visitor found your article in the first place. She had a problem, she typed a search query into Google, and found your article.
So you need to sketch out the problem. And the more graphically you do that, the more compelling your Introduction will be.
Of course, once you’ve explained the problem you need to tell the reader there’s a solution – that’s what you do in the next sentence.
And finally, there’s the promise – you’re asking your reader to give up 5 or 10 precious minutes in their day, so you need to assure them that it’s going to be worth their while. And you do that with the promise
You can see this technique in action in the first four paragraphs of this article, by Brian Dean:
For more tips on how to write compelling Introductions, head over to Successful Blogging and read my ‘Definitive Guide: How To Write A Compelling Intro For Your Next Blog Post’.
#2. Use transitional phrases
Some articles are almost effortless to read – that’s because they use transitions to keep you moving from one paragraph to the next.
But what are transitions exactly?
Simply put, they’re short sentences that link one paragraph with the next.
Transitions can also be conversational. They make the reader feel that the writer is chatting with them. And that adds to reader engagement.

Here are some examples of transitions.
- Here’s the interesting part…
- You won’t believe what we discovered
- So what’s the catch?
- The solution is simple…
- But that’s not all…
- For example…
- Case in point…
- Let me clarify…
Transitions are such an important part of increasing time on page that I did a whole study of the different kinds of transitions used by some of the most successful bloggers out there.
For more tips on how to use transitions in your blog posts, head over to Smart Blogger and read my article ‘How to Use Transitional Phrases to Keep Your Readers Sliding Down the Page’.
#3. Make your article easy to read
Another way to increase time on page is simply to make it easier for people to read your content.
This is where a lot of bloggers fall down: the font size is too small, the column of text is too wide, or the text is simply too dense.
Here are the 5 things you can do to quickly and easily make your blog posts easier to read.
Font family
When choosing a font for your web pages, the first thing you need to decide is whether to go for serif or sans-serif. Serifs are the little feet and the curly bits at the top and bottom of each letter.
It’s generally agreed that in print, serif fonts are easier to read because the serifs on each letter lead the eye to the next letter.
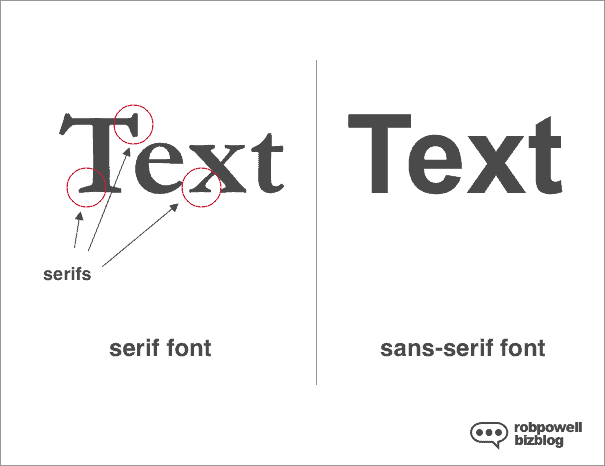
Which fonts are better on the Internet, serif or sans-serif, is an ongoing debate amongst typographers and designers.
In the early days of the Internet, when computer monitors had fairly low resolutions, sans-serif fonts were definitely better. The curly bits on serif fonts tended to get lost on low-resolution screens.
But computer screens now have much higher resolution so serif fonts display better than they used to.
Georgia is a serif font specifically designed for the Internet and it’s the font I use.
So serif or non-serif is no longer a clear-cut choice.
Verdana, Helvetica, Open Sans, Arial (all sans-serif), and Georgia (serif) are generally considered to be the most readable fonts on the Internet. Verdana has the advantage that it was specifically designed for computer screens.
Font size
I’m amazed by the number of blogs that use tiny font-sizes. Why make your readers squint?
So what font-size should you use?
That depends, of course, on what font you’re using.
But in general bigger is better. Some authorities, like Smashing Magazine, say 16 pixels should be the minimum (I use 18 pixels).
Column width
The width of your column is another factor that affects readability – how much horizontal movement the eye has to make.
People don’t read on the Internet, they scan. So very wide columns of text put a strain on your readers’ eyes.
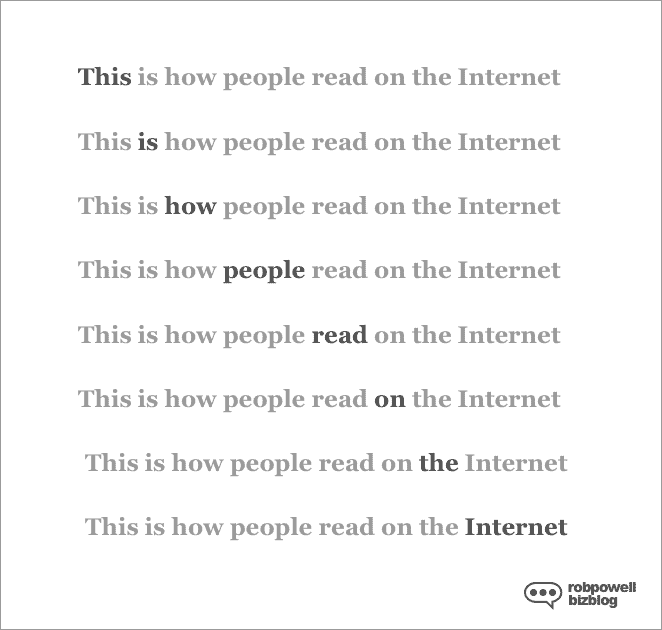
Opinions vary about the perfect width for online text, but it’s somewhere around 60 characters per line.
Baymard recommends keeping your text within the range of 50-75 characters per line while Smashing Magazine recommends 45 to 85 characters (including spaces and punctuation) per line.
My column width is about 90 characters (including spaces) – a little bit too wide, perhaps. That’s something I’ll probably get my website designer to adjust.
Line spacing
Line spacing or line height also has an impact on the ‘scanability’ of your text.
If your lines are too close together, it makes horizontal scanning difficult. But if your lines are too far apart, vertical scanning becomes difficult.
Practical Typography suggests the ideal line height should be somewhere between 120% and 145% of the font size.
White space
White space around your text, images and headings makes your content easier to read.
You can see this in the diagram below:
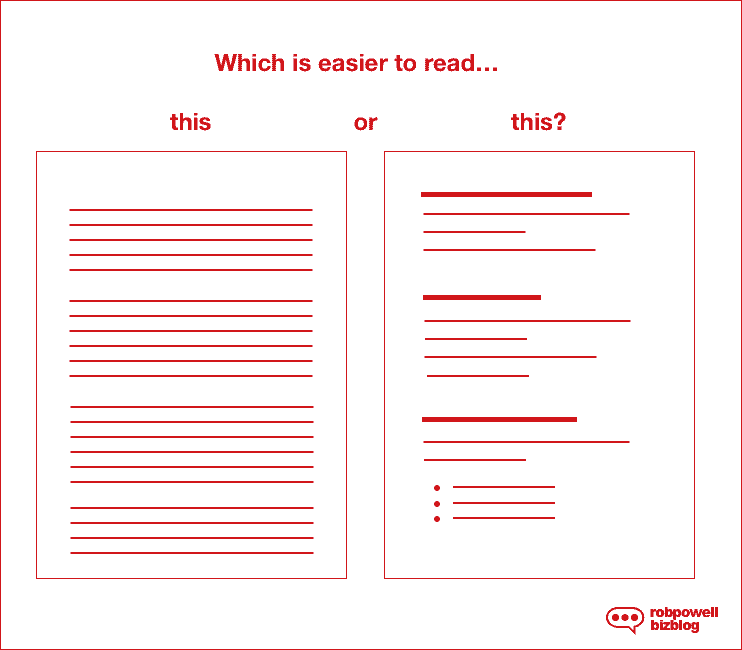
The page with more white space is way easier to read.
Always break up your text as much as possible, with images, bullet points, shorter paragraphs etc.
#4. Use headings and subheadings
When someone arrives on your site, chances are they’re looking for a particular bit of information in your article.
And that’s where headings come in.
Headings make it easy for your reader to find exactly what they’re looking for without having to read the whole blog post.
Headings also break up your text and just make it more digestible.
As a general rule, you need a new heading every 4 to 5 paragraphs.
Here’s another tip for your headings: use sentence case not title case.
- Which of These Headings is Easier to Read?
- Which of these headings is easier to read?
(sentence case is the 2nd example)
#5. Use images
Images are a must for increasing time on page.
They break up text, they make blog posts brighter and more visually appealing, and they make it easier to understand complex information.
Hubspot recommends using an image every 350 words.
Build Zoom reports that when they added a widget that displays images their time on site increased by a massive 150%!
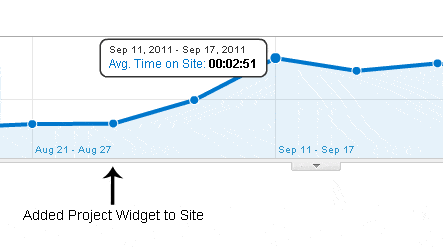
If you’re worried about about the cost of purchasing images, no need.
Here are 3 sites that offer images that are either licensed under Creative Commons or are free of copyright restrictions:
#6. Embed videos in your blog posts
One of the easiest ways to increase time on page is to embed a video within your blog post.
Whatever the topic of your blog post, just head over to YouTube and type in the main keyword phrase of your blog post. Chances are there’ll be dozens of short videos on that very topic!
Just make sure the video has plenty of likes and that its more than 3 minutes long and less than 10 minutes. Too short and the video is not going increase your dwell time, too long and your visitor will not want to invest the time.
Wistia did a study of the effect of videos on ‘dwell time’ or time on page.
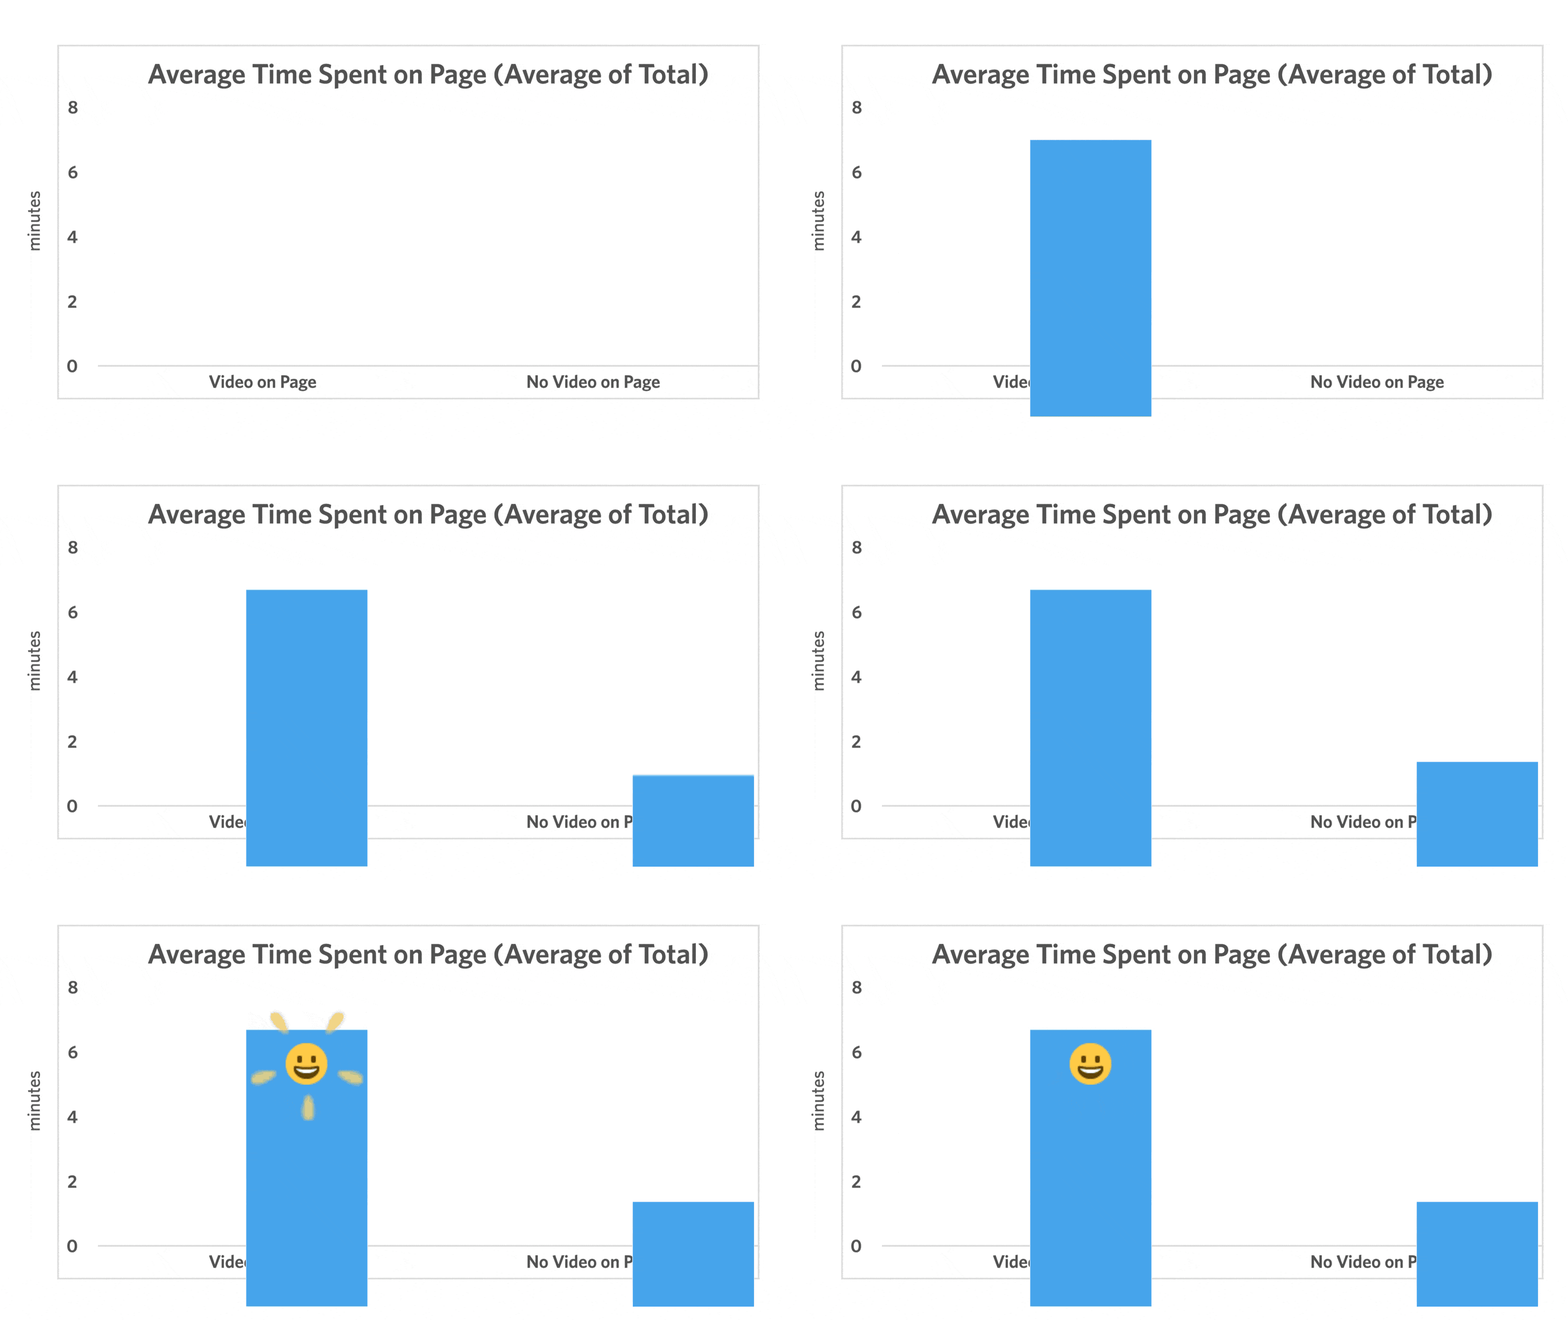
They found that the average time spent on pages with video was 7 minutes and 21 seconds whereas the average time spent on pages without video was 2 minutes and 48 seconds.
In other words, people spent on average 2.6x more time on pages with video than without.
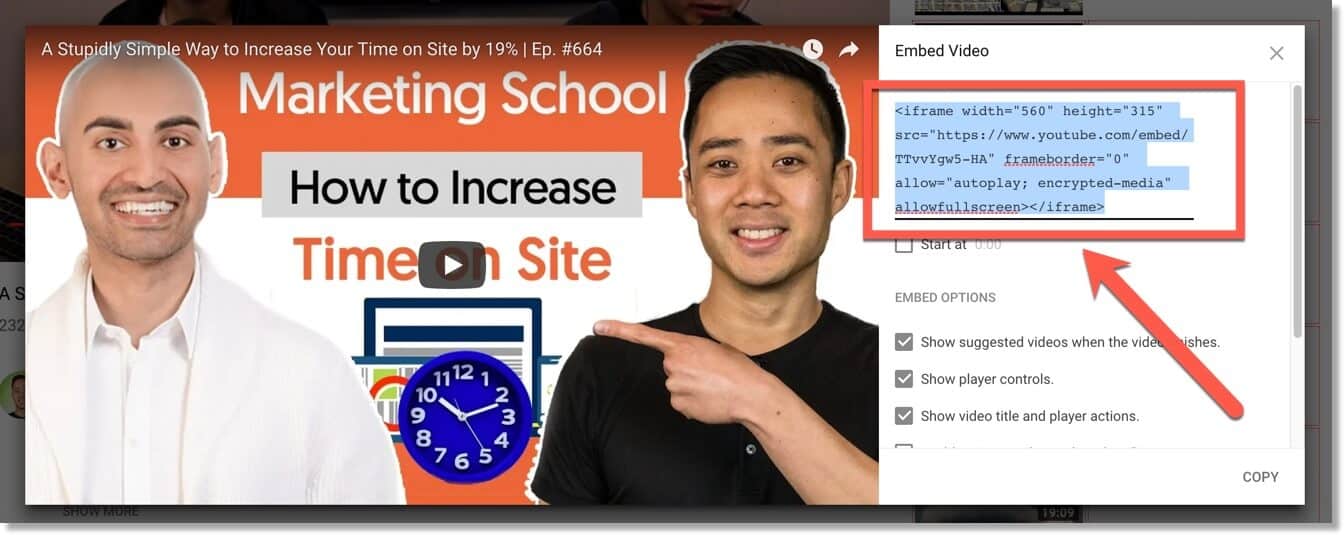
If you’re wondering how to embed a video within your blog post, it’s easy!
Once you’ve found the video you want on YouTube, just click on the ‘Share’ icon (bottom right corner):

Then click on the ‘Embed’ option:
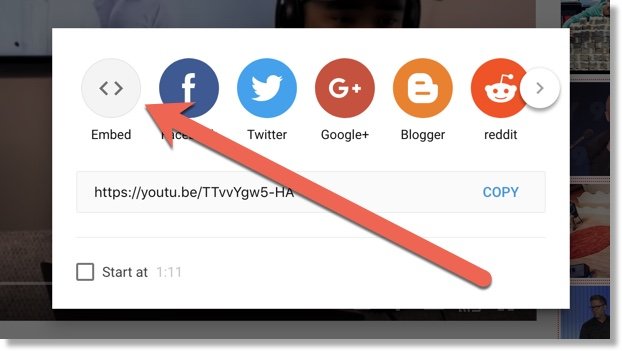
Then just copy the iframe code and drop it into a ‘raw html’ field in your WP editor.
ProTip: In the title of the video, include the length of the video in minutes and seconds. It helps your visitor decide if they want to commit to watching it.
#7. Use internal linking
Another way to increase time on page is internal linking.
Include links to other articles you’ve written that are related to the topic of your blog post.
When you link to another blog post on your site, make the anchor text the entire title of the blog post, like this: “15 Powerful SEO Hacks For WordPress Sites”
But how will that increase time on page? Doesn’t an internal link take the reader to another page on my website?
It does, but that’s okay because the critical factor that Google measures is ‘dwell time’. And ‘dwell time’ is the time between arriving at a page and returning to the SERPs.
So even if your reader gets diverted to another page on your site, it’s still going to increase your ‘dwell time’.
FURTHER READING
For more tips on how to use internal linking to improve SEO, see this article by DataBox: How to Use Internal Links to Boost SEO and the User Experience
Conclusion
Time on page is most likely a factor that search engines take into account when ranking web pages. So it’s a good idea to try and increase the amount of time your visitors spend on your pages.
Use the seven tips in this article to improve the readability of your content and you’ll find your time on page metric will improve